1) functions 250 times worldwide
2) 10 years warranty
3) transport to most European countries 25-55 €
4) within EU no additional customs or taxes
5) outside EU 16,7% off
6) pls check FAQs at details


best price/performance on a permanent slalom course in Europe. You get the major course components (stainless steel cable mainline, HeavyDutyTM buoy lines) plus assembly instructions. You buy the pipes for the buoy arms yourself (in Europe approx. €150) using 63 mm waste water PVC-pipes, wall thickness 3-4 mm. A detailed list of all pipe parts needed you will find in the assembly instructions that come with th ecourse. A purchase including pipes would double the cost of your slalom course. No buoys or magnets included.
Pregates are needed so skier knows where to pull out for the set up, plus the boat driver can enter the course in a straight line (no sudden corrections are wanted during skiers pull out).
Heavy duty is massive, strong, and built to last. We researched and tested all materials until we were absolutely certain.
To build courses yourself the investment of time and funds is much higher than what you'll pay for an EZ-Slalom HeavyDuty course (which is warranted against failure of materials or workmanship for 10 years!).
Our stainless steel mainline is the same cable our competitors also use. Same size, same strength, same manufacturer, same cable. This mainline cable is 3/32" in diameter (coated to 3/16"diameter using a clear, flexible PVC coating) or about the size of #12 electrical wire. You're wondering how such small cable can possibly be strong enough to hold up under high tension for extended periods of time (several years) while immersed in water? So were we.
The manufacturers break strength rating for this cable is 920 pounds of tension. Pretty tough stuff, especially considering it's diminutive size. Not being satisfied with that we went the extra step of having this cable break strength tested to insure that it is as tough as advertised as well as to satisfy ourselves of its strength. To our surprise, despite the manufacturers rating the cable tested out to be even stronger than advertised! Of over a dozen samples tested the lowest failure rating for any of our samples was 1050 pounds of tension, easily well beyond the amount of tension required to keep your course dead-on straight. Certainly then, this cable while not being massive in size is definitely strong enough to meet anyone's definition of "heavy duty".
What Makes Our Mainline Better?
So if we use the exact same stainless steel cable to build our mainlines as everyone else uses, what makes the EZ-Slalom cable mainline different? - Superior engineering.
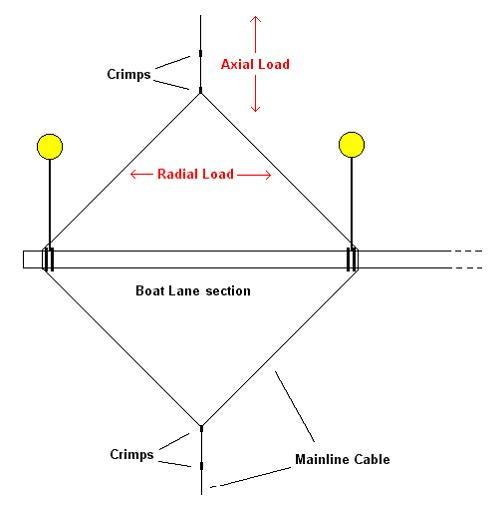
The most common way to attach two pieces of steel cable together is by crimping them together. No rocket science there. One of the main issues in designing a slalom course mainline is that where the buoy arm attaches to the mainline a connecting system of some sort must be created to stabilize the buoy arm perpendicular (that is, at a 90 degree angle) to the centerline of the mainline. This structure is known as the diamond due to the shape that is created when the buoy arm is attached at this point. The diagram above illustrates what the diamond looks like, how it's constructed, and how the buoy arm attaches to it. Basically you have one cable at the centerline of the course running from diamond to diamond positioning the buoy arms at their correct locations throughout the course. Where the diamond is located (where the buoy arm is attached to the mainline) you have that one cable attaching to two separate cables with each of the two cables attached to the buoy arm at either side of the boat lane section of the buoy arm. See the diagram above for more detail.
How Others Do It
Others attach the mainline's centerline cable to the cable sections that create the diamond using one crimp at each of the two end points of the diamond. They're connecting three cables together at this point, the one centerline cable intersecting with the two halves of the diamond. This one crimp is required to handle two different types of tension load, axial load and radial load. Axial load is the tension applied to the course's mainline to keep the course straight. Radial load is the sideways load placed on the crimp by the two halves of the diamond being spread apart by the buoy arm attached to it. See the diagram above for details.
Asking one crimp to take these two different types of load at the same time, and placing that entire load on only one crimp is asking a lot of that one crimp. Especially if you're using an aluminum crimp at this point. Aluminum is a relatively soft metal which when attached onto a dissimilar metal (the stainless steel) and then immersed in water (which aluminum crimps are not specifically designed for) subjects the crimp to galvanic corrosion. This potential for corrosion in combination with all of that load placed on only one soft crimp can cause the eventual weakening and/or failure of that crimp.
How We Do It
With the EZ-Slalom HeavyDuty mainline we divide that load between two crimps rather than just one. First, we build each of our diamonds separately by using two sections of cable with each cable staggered so that it leaves a tail at each end point of the diamond (see the diagram above). So at the diamond's end points there are only two pieces of cable being attached together, not three. Building the diamond in this manner places the entire radial load on only one crimp at each end point of the diamond. We then attach the remaining tail at each end of the diamond to another cable which runs from diamond to diamond. This second crimp takes the majority of the axial load. Thus we divide the tension load placed onto the cable between two crimps rather than putting it all on just one, lessening the load on each crimp and reducing the likelihood of failure at any crimped point.
The crimps that we use for our EZ-Slalom HD mainline are themselves different as well. Where others use aluminum crimps not specifically designed for marine applications, we use a crimp made from hardened copper and zinc that is manufactured specifically for use in a marine environment. Again, to ensure their strength was up to the necessary standards we've had these crimps laboratory tested with our cable to measure and ensure their resistance to failure under tension. In all of the samples tested these crimps held at least as much tension as the cable did before failure. Plus they're much more resistant to corrosion and therefore much less likely to fail. Better materials combined with better structural engineering, resulting in longer service life of the mainline and reduced likelihood of failure.
HeavyDuty Buoy Arms
Another significant difference between our EZ-Slalom permenent slalom courses and the others available is the manner in which we build our permanent course buoy arms. Where others use telescoping buoy arm designs more suited to portable course useage we build our permanent course buoy arms from materials suited to conditions encountered in a permanent instalation.
Our standard permanent course buoy arms are built in their entirety from Schedule 40 pressure rated PVC pipe. We offer them in 50mm pipe. However in our opinion the tradeoff between the price for materials and additional shipping (which is already built into the final cost of the course option you select) versus the rigidity of the larger pipe is at or past the point-of-diminishing-returns, at least in our studied opinion. We also offer course kits that can be customized to fit whatever size pipe or any other materials you choose to use for your buoy arms, generally at no additional cost. See our HEAVYDUTY COURSE KITS page for further information on this cost saving option.
HeavyDuty Buoy Lines
We also went beyond the norm to construct our permanent course buoy lines. Rather than going without any shock absorption whatsoever (which transfers more shock and vibration to the mainline and buoy arms, accellerating wear and reducing service life) or just using ordinary shock cord (which has limited service life) we utilize durable large diameter surgical-grade rubber tubing for shock absorption. These buoy lines will last seasons under normal conditions without failures caused by materials breakdown. We don't just tell you they'll last, we back it up with our warranty. Our HeavyDuty buoy lines are standard issue for all of our HeavyDuty permanent courses and HD course kits and can also be added to our portable courses as an option.
That's how we build all of our products at EZ-Slalom. We find the best available materials, combine them into the best engineering designs available, and price our products very competitively. Better built. Better designed. Better priced. EZ-Slalom!
FAQs:
How is the course anchored (at both ends)?
1 [hotwater.cc] there is an anchore option for the course, but for weight and cost reasons we recommend to get the anchors yourself. For a permanent course you need permanent anchors at both ends of the course, something that will stay put under high tension. Large hunks of concrete, old engine blocks, anything > 30 kg to stay when the course's mainline is tensioned. Something else that works well on muddy or mucky bottoms is a large flat plate of concrete, metal plate, or even a large lifting weight disc. A large flat plate will suction down to the muck and once set won't move.
How is the tension kept on the course throughout it's life?
2 [hotwater.cc] the heavy duty steel rope keeps the same tension for all the years you will be using the slalom. A rope or cable attaches from one end of the course to the anchor on that end, at the other end you will want a rope (nylon or poly pro, at least 15mm in diameter) coming up from the anchor to the end of the mainline. The free end of the rope passes through a shackle attached to the end of the mainline (a built in loop is provided), back down towards the anchor to a loop tied into the anchor rope and located around 4 - 5 meters from the shackle. The free end is then pulled back towards the shackle end of the mainline, creating a pulley-type tensioning setup. This is how slack is taken out of the mainline to tension the course. Detailed and illustrated instructions are included with your course to explain this clearly and in detail. Alternately you can attach a tensioning line to one of the anchors and drag the anchor until the course is tight, however if the anchors are massive enough or dug in enough this may not be possible to do. Occasional retensioning may be required (due to significant changes in water level in example) but should be very infrequent, assuming good holding anchors are used of course.
Is there a minimum/maximum depth of water required to install a course?
3 [hotwater.cc] for the slalom the depth does not matter, only for the anchor line.
How is the additonal pre-gate option attached to the course?
4 [hotwater.cc] on the course we deliver, the heavy duty steel mainlines just continues. Meaning the entire mainline is one continuous cable, anchored at both ends.
How easy is it to install magents on the course?
5 [hotwater.cc] Actually for courses using timing magnets the HD buoy line set includes 8 buoy lines with a nylon hook (same as the hook that the buoys attach to) which is built into the buoy line. The magnet rises up against the hook, the hook determines how deep the magnet sets below the water surface. The magnet is placed onto the buoy line before the buoy line is attached to the arm and rises up to wherever the hook is located; the hook can be adjusted to adjust the magnet depth. Very simple and easy to adjust setup. Then check with magneto test on the perfect pass.
What additonal items, (buoys, arms etc) would be required to have a fully functional course?
6 [hotwater.cc] You get the full course kit with detailed plan how to build the PVC-arms by yourself . Buoys and magnets you need to order seperately.
What would be the delivery cost for a full course and pre-gate option?
7 [hotwater.cc] The course is 25 kg, that is about € 60 to most European countries. 1 buoy is 0,3 kg, 1 magnet 0,6 kg. 31kg is the maximum for 1 parcel which costs about € 75 to most European countries.
what can be done against possible bending of PVC arms?
8 [hotwater.cc] One of the downsides to using PVC pipe for floating course buoy arms is that over time they can bend somewhat as gravity, weather etc work on them. But PVC water pipe is still the most cost effective and lowest maintenance material to use. One of the things that affect bend is the type of PVC used. The white water pipe type PVC is the most rigid and is the best to use. Gray electrical conduit and black DVW type PVC are much softer materials and bend easier, I strongly suggest against using those pipe types.
The wall thickness of the pipe can also have an effect. Thin wall pipe bends more easily and as such is really not very good for a permanent course. Great for a portable, not good for a permanent installation. The 2 inch Schedule 40 PVC we use here in the US (similar to your 63mm pipe there) has a wall thickness of about 4.5mm and generally holds up well. If the pipe you're suing there is thinner walled that may be one issue. But yes, over time PVC buoy arms will probably get a little warp to them from age and exposure. If it gets really bad it has to be replaced but generally it's not uncommon for a course using the 2" Sch. 40 here to go 10 years or more without too much issue depending on the conditions the course is subjected to.
Make sure there is a floatation chamber or something similar at the center of the arm between the inner boat guide and the turn ball to hold the arm level in the water. If you don't do that the arm will sag and bow and it will definitely warp under those conditions. As a last resort to insure turn ball location you can anchor the arm below the turn ball to hold it in place if it's not perfectly in line with the boat gate.